A leaking faucet rarely begins as a catastrophic emergency. In your home, it usually starts as a slow, rhythmic drip from the spout, a handle that suddenly requires real physical effort to turn, or a mixing valve that just cannot seem to balance hot and cold water streams anymore.
In almost all modern residential plumbing setups, especially single-handle designs, these annoying issues point directly to one piece: the internal mechanical cartridge housed deep inside the solid brass valve body.
Replacing a worn cartridge is one of the most practical, money-saving home repairs you can tackle yourself. However, your success depends entirely on understanding the specific design of your fixture and avoiding the common trap of forcing mismatched parts into a valve body where they do not belong.
The baseline hardware architecture inside modern American kitchens and bathrooms has completely transitioned away from legacy multi-piece compression valves.
Attempting to repair a modern mixing fixture using your grandfather’s procedures like changing isolated rubber washers or wrapping packing string will fail because the internal control mechanism is now contained entirely within a single, replaceable cartridge block.
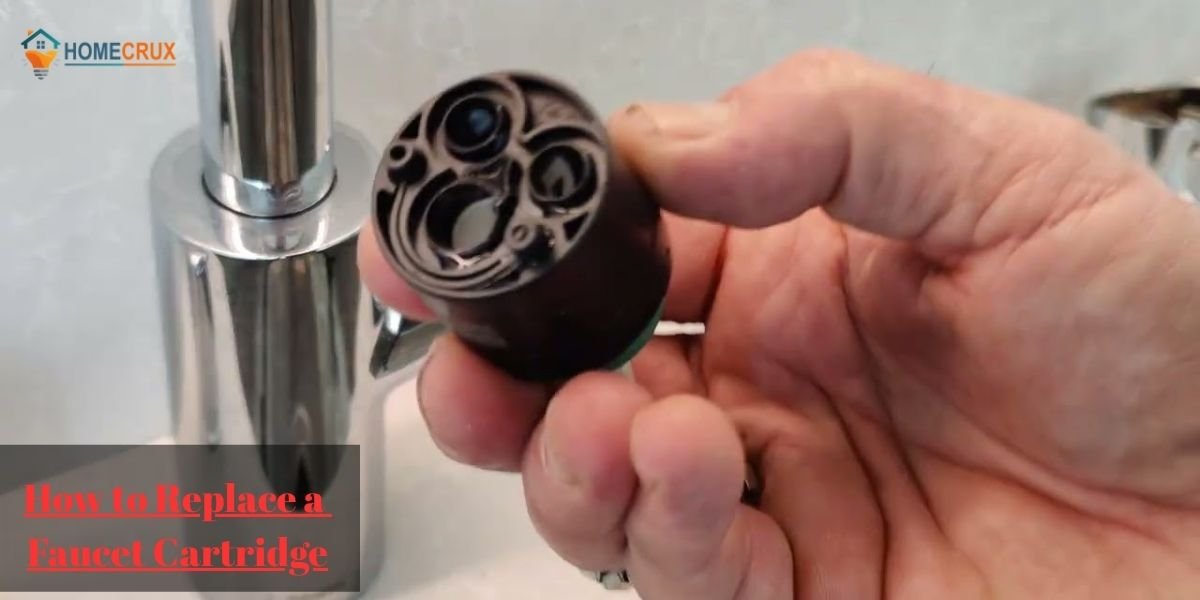
What a Faucet Cartridge Actually Does Inside the Faucet Body
Think of the cartridge as the primary command center of your entire faucet assembly. Its job is to simultaneously regulate how much water flows out and exactly how hot and cold water mix together when you move the external handle.
In contemporary fixtures from major brands you find in most homes, like Moen, Delta Faucet, and Kohler, this self-contained cartridge replaces the old-school compression brass stems that relied on brute force to squish a rubber washer.
Instead of crushing a rubber disc against a metal seat to stop the water, modern cartridges utilize highly engineered internal plastic, brass, or precision-machined ceramic discs that slide smoothly across matching channels to open or block the water lines.
When these internal components wear down, you will start noticing multiple distinct problems. Water will bypass the internal boundaries to create a steady leak even when the handle is completely shut off, you will feel real resistance when trying to adjust the handle, or the water temperature will jump all over the place because the internal balancing spools are jammed with debris.
Why Faucet Cartridges Fail in Real Homes
When troubleshooting residential plumbing, you quickly learn that faucet components do not just degrade from normal daily use. The breakdown of your cartridge is heavily accelerated by the specific chemical and physical characteristics of the local municipal or well water infrastructure passing into your house.
The three primary environmental conditions that systematically destroy your cartridge include:
- The structural accumulation of hard water minerals like calcium and magnesium, which crystallize inside the moving parts and seize your handle movement.
- The structural degradation of elastomeric O-rings and seals caused by continuous exposure to high hot-water temperatures over several years.
- Micro-abrasive scoring along the precision-machined internal surfaces caused by loose rust, sediment, or construction debris migrating through your main water lines.
The room where your faucet is installed often dictates how the failure will show up during your daily routine. In high-use kitchen setups, you will typically see a steady, maddening drip from the main aerator after you close the handle.
In bathroom vanities, the failure more frequently appears as a stiff handle that skips and jerks when you try to adjust it, or a noticeable thermal drift where the water turns freezing cold or scalding hot without you touching the handle.
Tools That Actually Make the Job Go Smoothly
Extracting a stuck cartridge requires specialized hand tools designed for precision work. Attempting to force internal plumbing components using heavy pipe wrenches or aggressive pliers will warp the thin brass valve sleeve, turning a basic repair into an expensive wall-demolition and valve-replacement project.
Before you begin taking anything apart, go ahead and gather these specific tools:
- An adjustable smooth-jaw wrench or a dedicated low-profile basin wrench.
- A complete set of metric and SAE hex keys to loosen hidden handle set screws.
- Insulated flathead and Phillips screwdrivers to remove decorative caps and retaining screws.
- A model-specific cartridge puller tool optimized for extracting calcified plumbing cores.
- Pure, non-petroleum silicone-based plumber’s grease to lubricate structural seals.
- A clean microfiber workspace towel to arrange your small parts sequentially.
Skipping the application of specialized silicone grease during reassembly is a primary cause of premature installation failure. Petroleum-based products like automotive grease or standard utility jelly must never be applied to your plumbing fixtures because they chemically break down elastomeric compounds, causing your new O-rings to swell, tear, and leak within months of installation.
Turning Off Water Without Creating New Problems
The very first physical step of your repair requires isolating the fixture from the pressurized plumbing loop of the house. Look directly underneath your sink basin to locate the dedicated hot and cold angle stop supply valves.
Turn the oval handles clockwise until they seat firmly to shut off the water lines. Once they are closed, move your faucet handle to the full open position to vent residual line pressure and drain any standing water safely into the basin.
The age of your home’s infrastructure can introduce secondary mechanical challenges during this isolation phase:
- Older multi-turn supply valves frequently suffer from internal washer degradation, which prevents them from creating a complete shutoff.
- If water continues to flow or drip from the spout after you have tightened the angle stops completely, your under-sink valves have failed.
- You must immediately locate the main water shutoff valve for the entire property and close it completely before touching the faucet assembly.
Venting the lines completely prevents sudden high-pressure spray bursts from hitting you in the face when you loosen the internal cartridge retaining ring.
Removing the Handle Without Damaging the Faucet
Modern product styling requires all functional assembly hardware to be hidden from plain view to keep the faucet looking sleek. The structural set screw that locks the handle onto the cartridge stem is usually concealed behind a small plastic red and blue index cap or a metallic brand badge.
Carefully pry this decorative cover loose using a thin, non-marring flat tool to reveal the internal hex or phillips set screw inside the handle cavity. Loosen this screw counterclockwise several turns, noting that complete removal is often unnecessary to slip the handle casting off the stem.
If your handle resists removal after the set screw is loose, do not attempt to pry it off by wedging heavy screwdrivers against the decorative outer body of the faucet. Mineral scale routinely welds the handle body to the cartridge stem over years of daily use.
Apply a small amount of penetrating scale-remover directly into the set screw opening, tap the casting gently with a plastic mallet to break the mineral bonds, and pull the handle straight out along the axis of the stem.
Extracting the Cartridge Without Breaking the Valve Body
Once you have removed the handle, you will see either a brass retaining nut or a small metal retaining clip holding the cartridge inside the valve body. Use your adjustable wrench to unscrew the retaining nut counterclockwise, or take a pair of needle-nose pliers to pull the retaining clip straight up and out of its slots.
With the retaining hardware removed, the cartridge is technically free to come out, but your real-world results will vary wildly depending on how long the fixture has been installed.
How the extraction usually goes down in real homes:
- In newer faucets installed within the last few years, the old cartridge will often slide straight out of the brass sleeve with a gentle pull on the stem.
- In mid-age fixtures, mineral deposits will create minor resistance, requiring you to grip the stem firmly with pliers and utilize a steady, twisting, back-and-forth rocking motion to break the seal.
- In older faucets exposed to heavy mineral water, the cartridge can become completely seized inside the sleeve, effectively fusing the plastic housing to the inner walls of the brass valve body.
If you encounter heavy resistance, stop pulling immediately and do not try to yank the cartridge out sideways with large pliers. Pulling or prying unevenly puts massive leverage on the internal plumbing lines, which can crack the underlying valve body or snap the copper supply tubes hidden behind your wall or sink deck.
For a seized core, slide a dedicated cartridge puller tool over the stem, tighten the center hex bolt down onto the cartridge body, and rotate the tool handle back and forth to safely break the calcified mineral bonds without distorting your permanent plumbing infrastructure.
Matching the Correct Replacement Cartridge (Most Critical Step)
This checkpoint is where the vast majority of weekend DIY repairs fail completely. Many homeowners assume that if a replacement part looks roughly similar in length or color at the home center, it will fit their faucet, but plumbing components are engineered with incredibly tight tolerances and are absolutely not universal.
Even within a single brand like Delta or Moen, the manufacturer may have utilized four or five distinct cartridge variations over a ten-year production run. To purchase the exact replacement match, you must evaluate several highly specific structural characteristics.
Before heading to the supplier, verify these exact physical traits on your old part:
- The structural shape of the stem tip, noting whether it uses a splined brass gear pattern, a flat D-shape notch, or a squared-off plastic block to engage the handle.
- The placement and footprint of the alignment tabs, which are small plastic ears on the sides of the cartridge body that lock into corresponding cutouts inside the brass sleeve.
- The configuration of the bottom seals, comparing the exact layout of the spring-loaded rubber cups or flat elastomeric gaskets that seal the hot and cold water inlets.
- The physical length and seating depth, measuring from the tip of the control stem to the baseline sealing surface to ensure the retaining nut can thread back down completely.
The single most reliable method to ensure a perfect match is to pack up your old, extracted cartridge in a plastic bag and take it directly to a dedicated plumbing supply counter or hardware store to match it by eye and model catalog.
Installing the Cartridge the Way Plumbers Actually Do It
Before you slide your brand new replacement cartridge into the wall or sink deck, you need to prepare the inner environment. Take a clean cloth or an old toothbrush and wipe out the inside of the brass valve sleeve to remove any loose flakes of rust, mineral scale, or old rubber fragments that could score your new seals.
Go ahead and spread a light, even coat of pure silicone plumber’s grease over all the external rubber O-rings and perimeter gaskets on the new cartridge body. This lubrication protects the rubber from pinching or tearing against the sharp metal edges of the brass housing during insertion, ensuring a completely watertight fit.
Line up the plastic alignment tabs on the sides of the cartridge with the matching grooves cut into the top edge of the brass valve body. Push the cartridge straight into the sleeve using steady, even thumb pressure until it seats firmly against the bottom inlets.
The unit must slide home smoothly without requiring heavy pounding or impact force; if it refuses to drop all the way down, pull it back out and check for hidden debris or misaligned notches inside the valve chamber.
Once the cartridge is perfectly flush, reinstall your metal retaining clip or thread the brass retaining nut back on clockwise, tightening it firmly with your adjustable wrench without using excessive leverage that could strip the threads.
Why Some Faucets Still Leak After Cartridge Replacement
It can be incredibly frustrating to turn your water lines back on after a methodical installation only to see a slow drip persist at the base of the handle or the tip of the spout. When a brand-new control core fails to stop a leak, the issue is almost never a defect in the replacement part itself.
In field diagnostics, recurring leaks are driven by specific systemic hidden conditions:
- A deeply scored or pitted valve seat inside the permanent brass housing, where decades of mineral friction have cut micro-grooves that allow water to bypass the new rubber seals.
- Minor alignment offsets where the retaining nut was cross-threaded or overtightened, causing the entire cartridge body to tilt slightly out of parallel inside its chamber.
- Excessive residential static water pressure exceeding eighty pounds per square inch, which can force water directly past standard elastomeric gaskets.
If you shine a bright flashlight down into the empty valve sleeve and observe deep, structural pitting or structural corrosion along the metal walls where the rubber seals must seat, the metal itself has degraded.
At that structural boundary, continuing to swap out internal cartridges becomes an exercise in diminishing returns, and your most practical path forward is to replace the entire faucet assembly.
What Experienced Repair Technicians Always Check First
Professional technicians do not simply pull a bad part out and drop a new one in without investigating the operational landscape of the fixture. Before unboxing any replacement hardware, an experienced service plumber will closely inspect the internal housing under direct, high-intensity light.
They spend time checking for specific system vulnerabilities:
- Hairline fractures or casting defects along the internal threads of the retention sleeve.
- Hidden mineral scale accumulation packed tightly inside the recessed hot and cold supply ports.
- The structural performance of the under-sink shutoff valves to ensure no mineral fragments broke loose during isolation to clog the new core.
This diagnostic verification loop is routinely overlooked in basic home repairs, which is why a newly installed cartridge sometimes suffers immediate seal degradation within weeks of a repair. Keeping the internal housing pristine is just as critical to your success as buying the correct part number.
Common Mistakes That Turn a Simple Fix Into a Bigger Repair
Most plumbing errors are entirely predictable and stem from rushing through the disassembly phase when encountering calcified components.
To keep your repair on track, avoid these common procedural errors:
- Twisting or prying stuck cartridges sideways with heavy locking pliers, which ovalizes the round brass housing and permanently ruins the faucet.
- Using petroleum-based lubricants like standard household jellies or automotive grease, which chemically dissolves the rubber seals over time.
- Attempting to modify or shave down plastic alignment tabs to force a mismatched cartridge model into the wrong valve body.
- Overtightening the decorative handle assembly or set screw, which deforms the plastic control stem and introduces permanent handle stiffness.
Frequently Asked Questions (FAQs)
How do I know for sure that my faucet cartridge is the bad component?
If your faucet continues to drip after you turn the handle completely to the off position, if the handle jumps or feels incredibly stiff during daily adjustment, or if your water temperature shifts randomly between hot and cold without manual input, your cartridge has failed.
Can I replace a faucet cartridge without buying special tools?
Yes, in a majority of instances where the faucet is relatively new, basic hand tools like an adjustable wrench, screwdrivers, and hex keys are all you need. However, if your home has hard water and the fixture is over five years old, a dedicated cartridge puller is highly recommended to avoid cracking internal plumbing.
Why is my brand-new cartridge still dripping after installation?
This usually occurs if loose mineral scale was left inside the brass sleeve during cleanup, if the new cartridge is misaligned with the internal notches, or if the permanent inner walls of the brass valve body are deeply pitted and corroded from long-term chemical wear.
Do all residential faucets use a standardized cartridge layout?
No, cartridges are highly proprietary and vary significantly by manufacturer, model line, and year of production. You must match the exact brand system, length, stem shape, and alignment notch configuration to achieve a successful, leak-free seal.
How many operational years can I expect from a new cartridge?
A standard residential faucet cartridge typically delivers five to ten years of reliable service. This operational lifespan depends heavily on your local water quality, the presence of hard mineral scaling, and how frequently the fixture is used throughout the week.