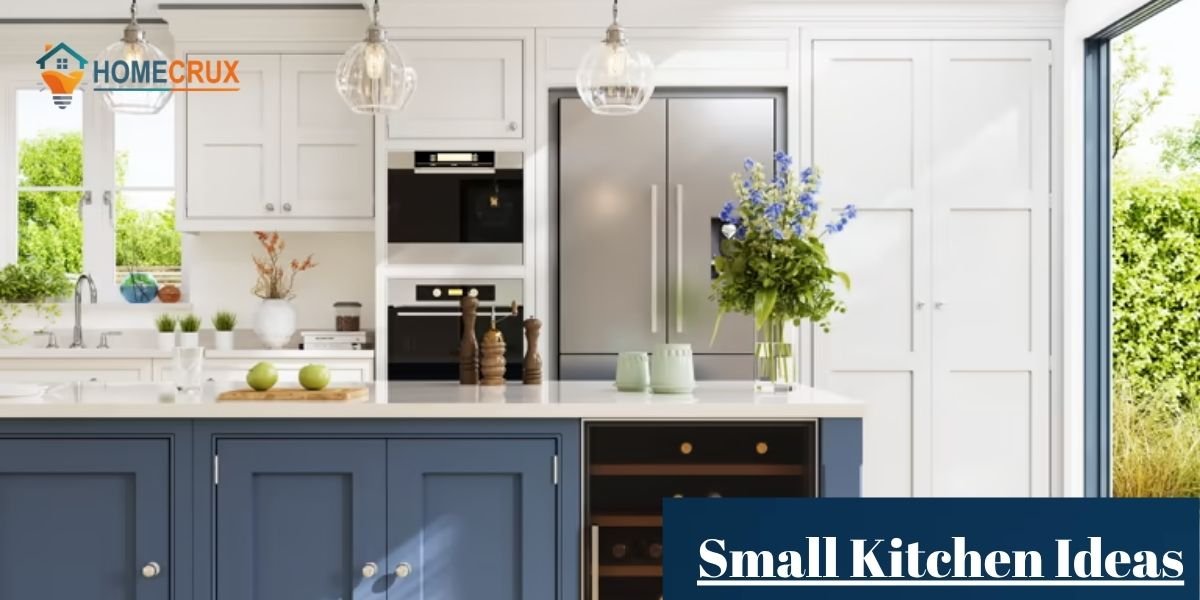
A kitchen renovation in a cramped space is often more challenging than a large-scale remodel because there is zero margin for error. Every inch you miscalculate or every poor material choice you make results in a “bottleneck” that disrupts your daily flow.
Most generic advice tells you to “paint it white” or “buy smaller pots,” but as a professional designer, I know that true spatial efficiency comes from structural changes and understanding the mechanical limits of your materials.
The strategies I am sharing below are rooted in thousands of hours of on-site experience. These are not just aesthetic suggestions; they are engineering solutions designed to solve the friction points of small kitchen designs.
We are going to look at how to leverage vertical real estate and why your choice of kitchen flooring is actually a structural decision, not just a decorative one.
Success in a tiny kitchen is about eliminating “decision fatigue” during cooking. By optimizing the layout and selecting high-performance surfaces, we can turn a 50-square-foot room into a high-output culinary station.
Let’s break down these expert-level interventions starting with the layout itself.
1. Switch to a Galley Layout When Space is Tight
In high-density urban apartments, the “U-shape” or “L-shape” kitchen is often a trap. Those layouts create deep corner cabinets that become “dead zones” where appliances go to die.
I always recommend a Galley (corridor) layout for tight spaces because it maximizes the two most important things: linear counter space and direct movement.
How to Execute a Strategic Galley Shift:
- The Parallel Run: Arrange two rows of cabinets facing each other. This creates a dedicated “work zone.”
- The 48-Inch Rule: To ensure functionality, you need 4 feet of clearance between the base units. This allows two people to pass or one person to work with the dishwasher door fully extended.
- Utility Grouping: Group your “wet” utilities (sink and dishwasher) on one side and your “hot” utilities (stove and oven) on the other. This prevents steam and heat from interfering with food prep and cleaning.
The benefit of this shift is financial as well as functional. Straight runs of cabinetry are significantly cheaper to install than custom corner units, allowing you to spend more on premium kitchen flooring or better appliances.
2. Use Full-Height Cabinets Instead of Multiple Small Units
A common amateur mistake is using standard 30-inch upper cabinets that leave a 12-inch gap at the ceiling. This gap is useless—it collects grease and makes the room look shorter. As an expert, my rule is simple: if you have a wall, use the whole wall.
Why Full-Height Units Win:
- Visual Elongation: Continuous vertical lines draw the eye to the ceiling, creating an optical illusion of height.
- The “Dead Storage” Tier: The top 12 inches of a full-height cabinet are perfect for items you use once a year, like holiday platters or oversized stockpots.
- Material Cohesion: Using a single large unit reduces the number of visible seams and handles, which reduces visual clutter.
For the finish, I recommend a flat-panel (Slab) door. In modern small kitchen ideas, the less detail on the cabinet face, the larger the room feels.
3. Replace Shelves with Deep Drawers in Base Units
If you are still reaching into the back of a dark lower cabinet to find a pan, your kitchen is failing you. Standard base cabinets with doors and fixed shelves are ergonomically obsolete for small spaces.
The Practical Reality of Drawers:
- Vertical Access: A drawer brings the contents to the light. You can see everything from above without kneeling on the floor.
- Heavy-Duty Specs: I always specify full-extension slides rated for 100 lbs. This allows you to stack heavy cast-iron Dutch ovens or ceramic plates with zero sagging.
- The Stack Strategy: Use a three-drawer stack. A shallow top drawer for cutlery, a medium middle drawer for daily pans, and a deep bottom drawer for large pots.
Replacing shelves with drawers is the single best way to maximize small kitchen ideas on a budget because it effectively doubles your usable storage without adding an inch to the floor plan.
4. Keep Countertop Zones Clear
The countertop is your “manufacturing floor.” When it is covered in toasters, knife blocks, and spice jars, your productivity drops and the kitchen feels claustrophobic.
Tactics for a Clear Workspace:
- The Magnetic Strip: Ditch the knife block. A wall-mounted magnetic strip keeps knives accessible and off the counter.
- Integrated Microwave: Move the microwave into a lower drawer or an upper cabinet shelf. Never let it sit on the prep surface.
- Undermount Sinks: Using an undermount sink allows you to wipe crumbs directly into the basin. It eliminates the “lip” of a drop-in sink, which saves about 1 inch of usable space around the perimeter.
A clear counter isn’t just about looks; it’s about the psychological freedom to cook without moving three things just to chop an onion.
5. Use Light Flooring Tones to Expand Visual Space
The floor is the foundation of your kitchen’s light profile. Dark floors act like a “black hole,” absorbing light and making the walls feel like they are closing in.
Expert Flooring Tone Recommendations:
- Bleached Oak or Ash: These provide a warm, natural look but stay bright enough to bounce light.
- Soft Grey Stone: Ideal for hiding the occasional dust bunny while maintaining a crisp, modern aesthetic.
- Matte Finishes: Always choose a matte or honed finish over high-gloss. Gloss shows every water spot and scratch, whereas matte provides a steady, diffused light.
Practical Options for Light Tones:
- Luxury Vinyl Plank (LVP): Incredible durability and easy on the budget.
- Porcelain Tile: The most “pro” option for light-colored stone looks.
- Light Concrete Screed: Perfect for an industrial-style modern small kitchen.
6. Choose Flooring Based on Spill Resistance
In a small kitchen, a leak from the fridge or a splash from the sink reaches every corner of the floor almost instantly. You cannot afford a floor that “drinks” water. This is where material science becomes more important than style.
The Hierarchy of Spill Resistance:
- Porcelain (The Gold Standard): It has an absorption rate of less than 0.05%. You could leave a puddle on it for a week and it wouldn’t stain or swell.
- SPC Vinyl (Stone Plastic Composite): This is the best flooring for kitchen use if you want a wood look. Unlike laminate, the core is made of stone dust and plastic, making it 100% waterproof.
- What to Avoid: Stay away from standard laminate or solid hardwood. The humidity and inevitable spills will eventually cause the seams to peak or the wood to buckle.
As an expert, I only feel satisfied when I know the floor can handle a dishwasher malfunction without needing a total replacement.
7. Use Continuous Flooring to Avoid Visual Breaks
To make a small house feel expansive, you have to stop “zoning” with your floors. When you change the floor material at the kitchen doorway, you are telling the eye, “This is a small, separate box.”
The Seamless Approach:
- The “Infinity” Look: Run the same flooring from your living area directly into the kitchen.
- No Thresholds: Avoid bulky T-moldings or transition strips. A flush, continuous floor makes the entire home feel like one large suite.
- Plank Direction: Run your planks parallel to the longest wall of the house. This guides the eye through the kitchen and into the next room, masking the actual footprint of the kitchen.
8. Install under-cabinet lighting
Shadows are the enemy of small spaces. If you only have a central ceiling light, you will spend your time prepping food in your own shadow, which makes the room feel smaller and more dangerous. Under-cabinet lighting is the single most effective way to improve modern small kitchen ideas without moving a single wall.
The Professional Approach to Lighting Task efficiency is the main goal here. I recommend high-quality LED strips with a color temperature between 3000K and 4000K. This range provides a crisp, natural light that makes chopping and measuring safer and more accurate.
Lighting the backsplash also erases the dark corners where the wall meets the counter. This pushes the walls back visually, making the depth of the counter feel infinite. For the best results, use hardwired LEDs rather than battery-powered pucks. They provide a continuous, flicker-free stream of light that feels integrated into the home’s architecture.
9. Avoid oversized tiles in very small kitchens
There is a common myth that huge tiles make a room look bigger. In a tiny kitchen, the opposite is often true. If you place massive tiles in a narrow kitchen, you might only see one or two full tiles before they are cut off by the cabinets. This creates a disjointed look that highlights how small the floor actually is.
Tile Proportions and Layout Using mid-sized tiles allows for enough repeat of the pattern to establish a rhythm. For example, 12×24 inch tiles or 8×48 inch planks are excellent for small kitchen designs because they provide enough surface area to look modern without overwhelming the space.
Large tiles also require complex and expensive cuts in tight corners. This often leads to awkward, thin slivers of tile at the edges that look like an afterthought. A medium-format tile provides a sense of human-scale proportion that feels comfortable.
If you match your grout color closely to the tile, the lines will disappear, giving you that seamless look without the logistical nightmare of oversized slabs.
10. Prioritize sink-to-stove workflow alignment
In professional kitchens, the relationship between where you wash your vegetables and where you cook them is the heartbeat of the operation. This is often called the Pivot Zone. If these two points are too far apart, you waste energy. If they are too close, you lack prep space.
The Ideal Workflow Setup Ideally, the sink and stove should be separated by a minimum of 24 to 36 inches of clear countertop. This is your primary prep station.
In small kitchen designs, keeping these two elements on the same run of cabinets is a safety priority. It prevents you from carrying dripping food or hot pans across the floor, which protects your kitchen flooring from slip hazards and long-term moisture damage.
11. Use neutral backsplash to reduce visual clutter
The backsplash is located at eye level, making it the most visible vertical surface in the room. If you choose a loud, high-contrast pattern, it becomes the only thing the eye sees, which effectively closes in the room.
Backsplash Material Strategy I highly suggest using a neutral palette such as whites, creams, or light grays. A classic subway tile with matching grout is a top choice because it provides texture without the noise of dark lines.
For an ultra-high-end look, use the same material for your backsplash as your countertop. This creates a seamless vertical transition that makes the kitchen look custom-built and much larger than it is. This continuity eliminates the visual break at the counter line, making the walls appear taller and the counters deeper.
12. Keep appliance placement compact
In a tiny kitchen, appliances are the biggest space-hogs. To maximize your human space, you must minimize the machine space. This doesn’t mean you have to lose functionality, it just means you need to be smarter about the footprint.
Appliance Sizing and Grouping Look for apartment-sized appliances that are designed for urban living. A 24-inch wide fridge and an 18-inch dishwasher can save you over a foot of horizontal space compared to standard sizes.
You should also group your heat-generating appliances. Stack your oven and microwave in a tall cabinet tower. This frees up lower cabinet space for those deep drawers we discussed earlier and keeps your kitchen layout streamlined. When appliances are scattered, they break up the countertop and make the room feel fragmented.
13. Choose flooring that can handle long-term moisture exposure
Standard spills are easy to wipe up, but long-term moisture refers to the humidity behind the fridge or the slow, unnoticed drip under a dishwasher. Your best kitchen flooring choice must be chemically stable and physically non-porous to handle these hidden threats.
Reliable Flooring Options:
- Porcelain Tile is completely unaffected by water and is the most durable option for long-term moisture resistance.
- Sheet Vinyl is a budget-friendly hero because it has no seams for water to seep through to the subfloor.
- Stone Plastic Composite or SPC vinyl has a rigid core that remains 100% waterproof even if submerged for hours.
I always recommend applying a silicone bead around the perimeter of the flooring where it meets the baseboards. This creates a watertight seal that prevents a small spill from turning into a subfloor rot issue.
Avoiding materials like standard laminate or solid hardwood in the kitchen is vital because the humidity and inevitable spills will eventually cause the seams to peak or the wood to buckle.
14. Plan storage before design
Most people pick their cabinet colors and then try to fit their stuff inside later. A real expert does the opposite. You must audit your inventory before you buy a single hinge to ensure the kitchen actually functions for your lifestyle.
Effective Storage Zoning Start by grouping your items by how often you use them. Zone 1 is for daily dishes and oils that need to be within easy reach. Zone 2 is for small appliances and mixing bowls that you use a few times a week. Zone 3 is for the holiday turkey platter and deep fryers that only come out once a year.
If you haven’t used an appliance in 12 months, it doesn’t belong in a small kitchen. Every item must justify the space it occupies. By planning your storage first, you can ensure that every cabinet and drawer is sized perfectly for your specific needs, preventing wasted space and keeping your counters clear.
Closing Lines
Transforming a small kitchen is a game of inches where the right kitchen flooring and a disciplined layout make all the difference.
These 14 ideas are not just about saving money, they are about investing your budget where it actually impacts your quality of life. By focusing on spill-resistant flooring, seamless visual lines, and ergonomic pivot zones, you move past the limitations of a small footprint.
When you align your storage with your actual cooking habits and choose materials that resist long-term moisture, you create a kitchen that is both beautiful and indestructible.
Remember, a well-designed small kitchen doesn’t feel small, it feels efficient. Use these expert pillars to build a space that works for you rather than a space you have to fight against every single day. The goal is to maximize every square inch so that your cooking experience is fluid, organized, and stylish.